Beyond The Dead Bug–How To Regain Lost Hip Mobility
In Jiu-Jitsu and kettlebells hips are everything! The more hip mobility you have, the more capable you'll be of maximizing your strength potential and not only that -- it also forges a more resilient body to resist submissions and potential injury (which I'll get into at the end of this post).
In my 20 years on the mat, I've seen more shoulder and knee injuries than anything else as a result of tight hips (and shoulders).
I believe it's the Chinese who refer to the shoulders and hips as "the four knots".
The better connected these "four knots" are, the more resilient you'll be ----> the more strength you can build
-----> and the better you'll move.
These four knots are also referred to as our "virtual X" -- the tighter the "X" the stronger the body.
In today's post we'll cover one of the most effective "movement strategies" to unlock your hips and shoulders for Jiu-Jitsu and everyday life, The Dead Bug.
But, this isn't any Ol' Dead Bug you've ever seen.
Today we will be going...
Beyond the Dead Bug and how to restore hip and shoulder mobility–so you can train more without feeling broken!
Crawling has been the "new rave" over the last 10 years and rightly so. There are many endless benefits.
However, not everyone is a good candidate for crawling.
For instance...
A pre-existing knee injury like: meniscal tear or ACL reconstruction. Loading your knees will feel like you're kneeling on shards of glass.
A pre-existing wrist injury because your training partner loves hitting you with wrist locks, (there's a special place in hell for wrist lockers, LOL) will also be a problem.
In 2009 I tore my left medial meniscus and began incorporating crawls into my programming, and it was not comfortable.
So I had to come up with an alternative.
Around 2010/2011, I learned The Dead Bug was a great alternative to crawling and it packed all the same benefits.
Such as:
How to go beyond the Dead Bug
Gray Cook once said, "movement is a behavior".
Think of a child, if you do not correct their misbehavior early on, it will only get worse. Same goes for how we move.
With that said...
Once you've grasp the concept of the Dead Bug and have made an increase in hip or shoulder mobility -- it's time to load the pattern.
In Functional Movement Systems (FMS), the only way to "lock in" a movement pattern is to load it in the following order:
- Static motor control (SMC): Kettlebell carries, single leg deadlifts and half kneeling holds.
- Dynamic motor control (DMC): Single leg deadlifts and half kneeling kettlebell presses.
- Strength: Here's where you load the patter. For shoulders, kettlebell presses are great and for hip mobility, deadlift are key.
Going beyond the Dead Bug will address both SMC and DMC.
Here's how:
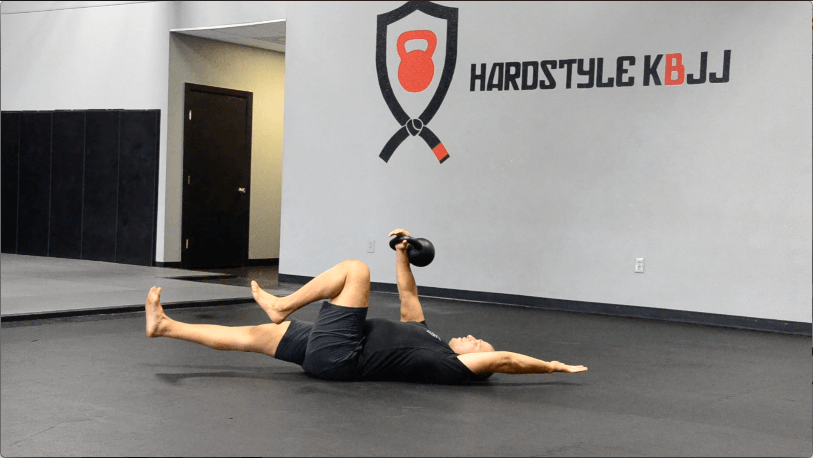
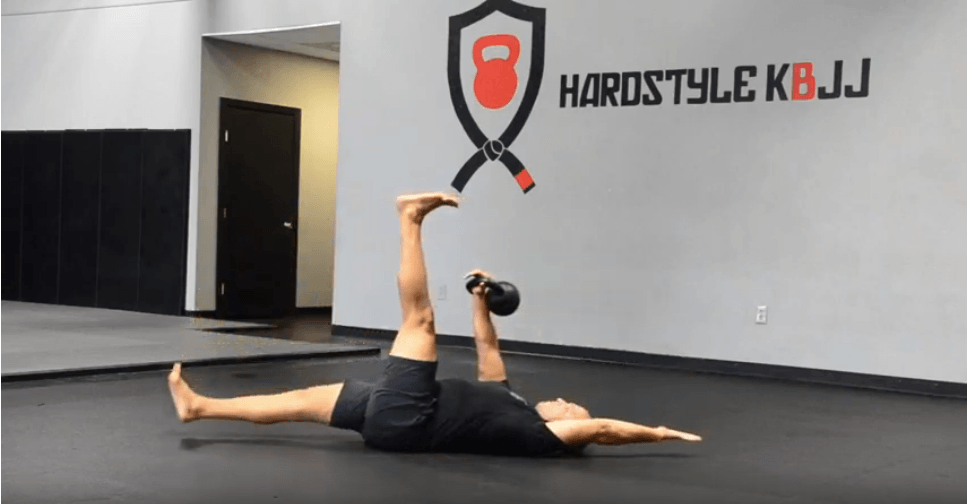
In the image to the right, you can see, my right arm (holding the kettlebell) remains "static" and my left hip remains "static".
While both my left arm and right hip are "dynamic". You can see how this connects the hips, shoulders, and crosses midline just like crawling.

I mentioned above, single leg deadlift is a great DMC and strength exercise.
If you look closely, the Loaded Dead Bug looks a lot like an "unloaded" single leg deadlift. Pretty cool, eh? Killing multiple birds with one stone.

*This* is how to improve your strength and mobility at the same time, put hours back in your week to train more and still have time to be the husband and father you need to be for your family.
Which leads me to...
Why you need the Loaded Dead Bug and how better shoulder mobility improves your life.
Most positions on the mat have you in a slumped position -- tack on a busy career which has you sitting the majority of the day -- it's a recipe for disaster.
How?
Poor hip mobility + Poor shoulder mobility = Poor posture & positioning
Even worse...
Eventual injury -- resulting in you needing to take time off from training.
(and you'll NEVER get better this way)
One thing's for certain -- as a new BJJ practitioner, you'll get tapped, A LOT.
And the best way to overcome submissions and ensure you're not injured is... improve your shoulder mobility.
Why?
Better shoulder mobility leads to better your positioning and results in better defense against both arm and shoulder locks.
The additional range of motion creates a "buffer zone" to help you resist submissions so you can escape.
Make sense?
This's how you get better, especially if you're just starting out in Jiu-Jitsu, because you will get caught in subs often.
Now, for the meat and potatoes of this post (thanks for reading to this point)!!
How to incorporate the Loaded Dead Bug and what size kettlebell to use:
The great part about this exercise is, it doesn't take a lot of time but, produces massive mobility gains!
Recommended kettlebell size:
- Beginner men: 12kg
- Experiences men: 16kg
7 Minute Dead Bug Recharge:
- Start your practice with 3 minutes of diaphragmatic breathing. I like this tactic because it gives you immediate feedback of your current hip mobility.
- Next, move to the unloaded Dead Bug. Be sure to follow the regressions in the video I included in this post.
Complete 20 reps total (10 per side) and really focus on your breath. Rest about 30-60 seconds and repeat for a second set. - If you're ready, move to the Loaded Dead Bug. Using one of the KB's I recommended above.
Complete the same number of reps, 20 total (10 per side).
Since you're now using load, rest at least one minute before moving onto the next set. If you have the time, complete a second set.
Over all, this should take you about 7 minutes (give or take).
Now, you're ready to lift (or hit the mat)!
If you have any questions, leave me a comment below.
(Or just say, "hello" 🙂)
hec g.
